

CyberPanel installation with Ubuntu web server on web server managementDo you want to make it easier? This guide will explain step by step how you can install CyberPanel from scratch and manage your server more efficiently. Especially on Linux-based systems, you can easily control important components such as websites, databases and email accounts with a simple panel interface.
CyberPanel is ideal for both beginners and experienced users who want to quickly manage their web projects, adjust security settings, and monitor server resources. In this article, you will learn how to install CyberPanel on Ubuntu to publish your websites more flexibly and securely.
What is CyberPanel?
CyberPanel is a control panel designed to simplify web server management, especially on Linux-based systems (like Ubuntu). Thanks to its interface, you can:
- You can create more than one website and assign domain names to them.
- You can manage databases, open email accounts, and adjust security settings.
- You can monitor server resources (RAM, disk usage, etc.) from a single panel.
CyberPanel makes server management more accessible and reduces complexity with its automation features.
Advantages and Disadvantages
Like every software and panel, CyberPanel has its own pros and cons. Evaluating these before installation will provide a healthier management process later on.
Advantages
- User Friendly Interface: It offers management with a simple web interface instead of complex commands.
- Speed and Efficiency: You can achieve high performance with LiteSpeed-based (OpenLiteSpeed or LiteSpeed Enterprise) infrastructure.
- Easy Installation of Additional Components: You can add services such as email server (Postfix), DNS (PowerDNS) and FTP (Pure-FTPD) with a single click.
- Community Support: Thanks to official forums and communities, it is possible to find quick solutions to problems.
Disadvantages
- OpenLiteSpeed Edition Limited: The free version, OpenLiteSpeed, has more limited features than LiteSpeed Enterprise.
- Prevalence: Since it is not as widespread as cPanel or Plesk, some resources and plugins may be limited.
- Additional Installation Times: Optional services (DNS, email, etc.) may take time to set up.
Alternatives: There are paid panels like cPanel or Plesk that offer similar functionality. For personal or small projects, the free OpenLiteSpeed version of CyberPanel may be more than enough. If you have more corporate or high-traffic sites, you may also want to consider LiteSpeed Enterprise or other control panels.
Steps to Install CyberPanel on Ubuntu
1. System Requirements
To install CyberPanel, you must meet the following minimum requirements:
- A clean install of Ubuntu 18.04, 20.04 or 22.04
- At least 1024MB RAM
- At least 10GB of disk space
Once you are sure that you meet the requirements, you can proceed with the installation.
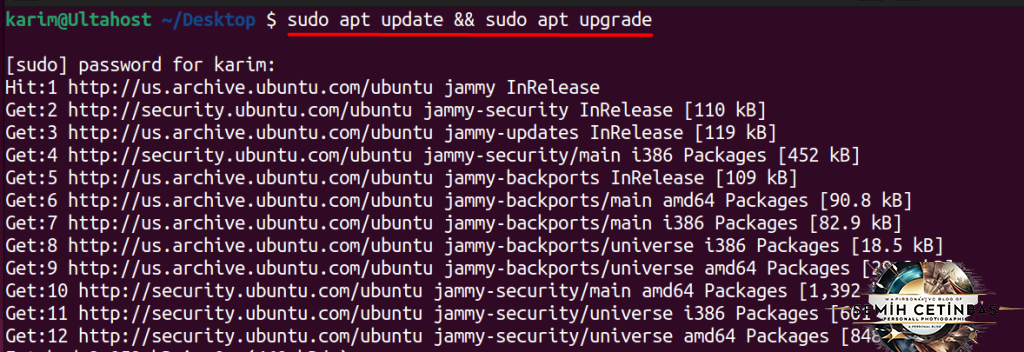
2. Update the Server
First, it is always a good start to update the packages on Ubuntu. To do this, use the following command:
sudo apt update && sudo apt upgrade

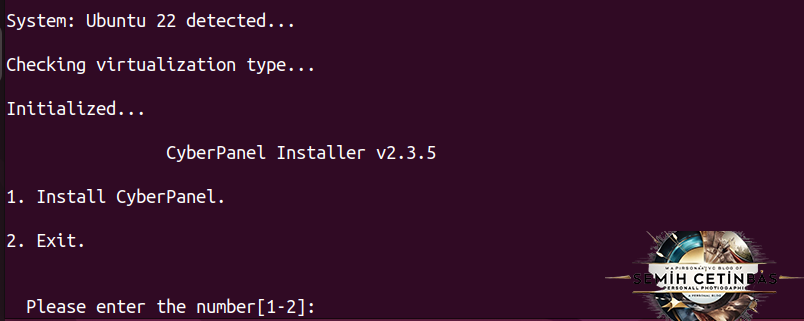
3. Run the Installation Script
There is a script that automates the CyberPanel installation. Start the installation by running the following command:
sudo su - -c "sh <(curl https://cyberpanel.net/install.sh || wget -O - https://cyberpanel.net/install.sh)"
After the command runs, it checks if your system is suitable and asks you questions like "Do you want to install CyberPanel?" Here 1 When you select the value, the installation will start. Your hardware status will then be displayed and you will be asked if you want to continue.
4. Choosing OpenLiteSpeed or LiteSpeed Enterprise
Two options are offered here:
- OpenLiteSpeed: It is a free and open source version of LiteSpeed. Suitable for small projects or those with limited budget.
- LiteSpeed Enterprise: It has more advanced features and high performance but requires a paid license.
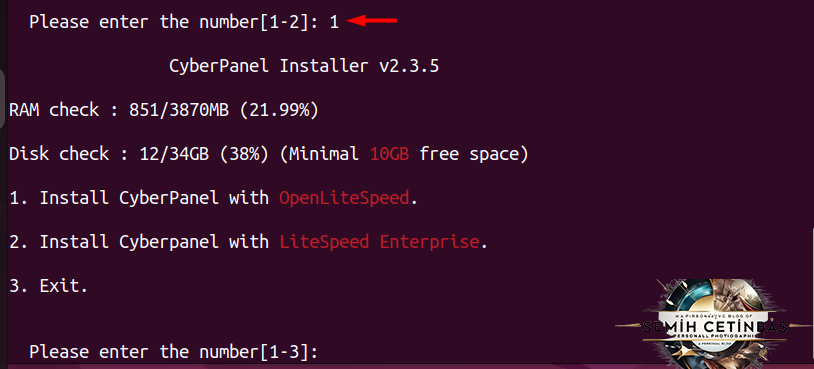
If you expect high traffic and need more advanced features, you may want to consider the Enterprise edition, but in this article, we'll be using the free OpenLiteSpeed option.
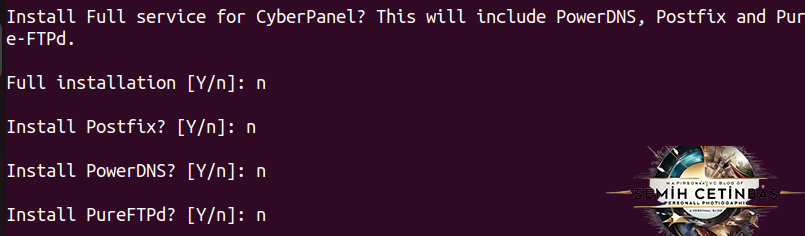
5. Installing Additional Components (PowerDNS, Postfix, Pure-FTPD)
During installation, you will be asked for a preference regarding the installation of additional services (DNS, email, FTP). “Y” If you press the key, components such as PowerDNS, Postfix and Pure-FTPD will also be installed. This allows you to use CyberPanel as a full-fledged hosting control panel.
But if you just want to do basic web server administration “N” You can choose a minimal installation by pressing the button. With this option, you will continue without setting up DNS, email or FTP servers.
6. MySQL Configuration
The next step asks if you want to access the MySQL server remotely (Remote MySQL). If you pass “N”, you can use the database service locally. Using a remote database can provide advantages in terms of scalability.

7. Memcached and PHP Extension
You will then be given the option to install Memcached and the associated PHP extension. Memcached, reduces database queries and increases the speed of your website by storing frequently used data in RAM. If you want high performance, you can choose "Y" at this stage.

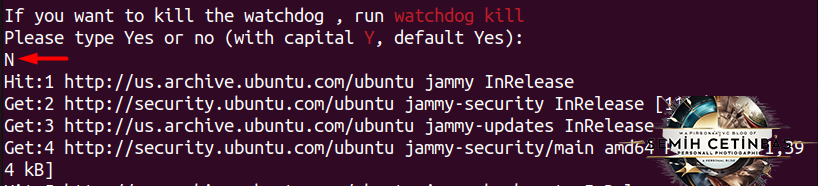
8. WatchDog Installation
WatchDog, is a monitoring tool that monitors web server and database services and automatically restarts them in case of unexpected outages. It is useful for projects that want to stay online all the time. If you wish, you can activate this option during installation.
After you make all your selections, the installation may take approximately 10 minutes. This time may vary depending on your internet speed and system resources.
Launching and Logging Into CyberPanel
1. Learning the Server IP Address
You can find out your IP address with the following command via terminal:
ip addr show
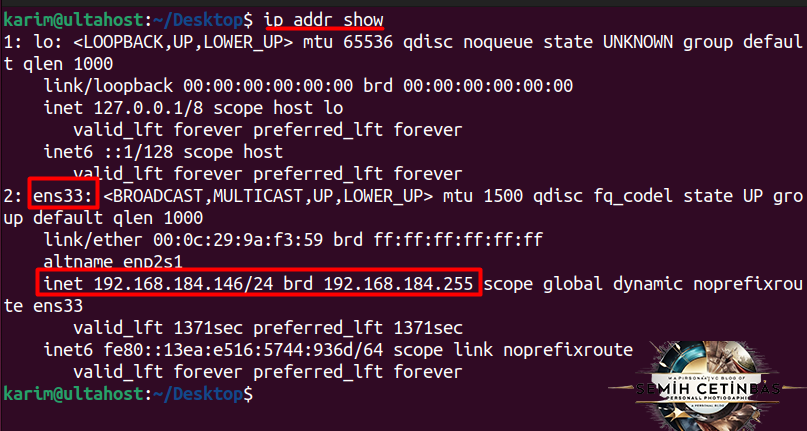
Select the appropriate interface from the displayed interfaces (for example, “eth0” or “ens3”). inet information and take note of your IP address.
2. Accessing the Web Interface
You can access the interface by entering your server IP in the address bar of your browser as follows:
http://server_ip_address:8090
Replace the "server_ip_address" with your own IP or domain name. Make sure you have configured your server's firewall settings (port 8090) appropriately so that this port can be accessed from outside.
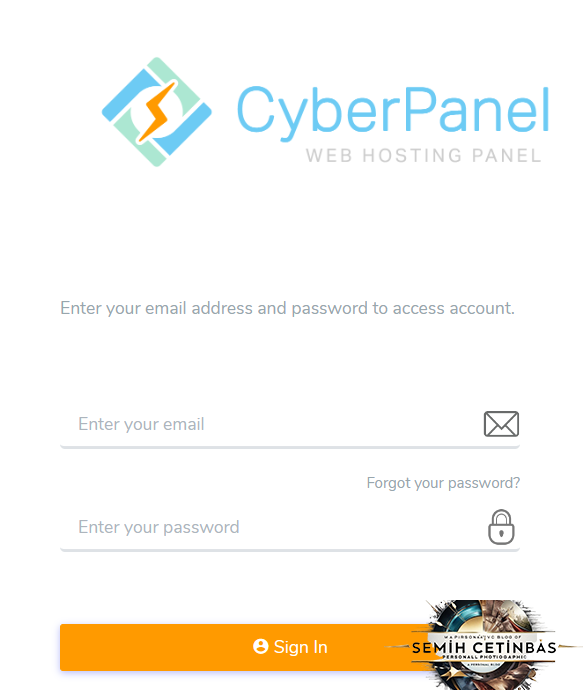
3. Login to CyberPanel
You will see a login screen. Default username admin and password passwd You will be asked to change your password during your first login; make sure to choose a strong password.
For security reasons, it is recommended that you change the default password in the “Settings” section immediately after logging in. Now you can add your websites, manage databases, and set up SSL certificates. Web server management thus it can be realized from a single panel.
If you would like to learn more or check out our similar guides web development guide You can review my page.
Also official On the CyberPanel website You can find detailed documentation at .
Conclusion
CyberPanel, Ubuntu web server It offers a practical solution for those who want to publish their websites easily and quickly in the environment. CyberPanel installation Afterwards, you can manage database, e-mail, DNS and other services from a single point with a powerful interface. Thus, web server management Even if you have no experience, you can quickly implement your projects and reduce your management costs.
Frequently Asked Questions (FAQ)
- Q: In which versions does the CyberPanel installation work more stably?A: In LTS (Long Term Support) versions like Ubuntu 18.04, 20.04 and 22.04 CyberPanel installation generally works more stable and compatible.
- Q: On CyberPanel Ubuntu web server How can I backup my configuration?A: CyberPanel has backup and restore tools. You can get your databases and sites from the “Backup” section in the panel and easily restore them when necessary.
- Q: With OpenLiteSpeed instead of LiteSpeed Enterprise web server management would it be enough?A: For small or medium-sized projects, OpenLiteSpeed usually offers sufficient performance, but for high-traffic and corporate projects, the Enterprise edition is a better option.